I recently visited Stanford University’s School of Medicine, specifically their Division of Clinical Anatomy. About a month prior to visiting I found they offered anatomy tutorials open to what seems to be anyone. I have a good deal of anatomy background, I talk about it all the time, I took your standard Anatomy and Physiology classes in college; why do this?
First, you get to use cadavers. I used your customary plastic models in college but I never got to work with the real thing. Anyone I’ve talked to, especially those in the medical profession, tell me models don’t get the job done. There’s no replacement for the actual thing.
Second, it was an opportunity to visit Stanford. My main draw to the university is it’s where Robert Sapolsky resides (Why Zebras Don’t Get Ulcers). I’m not big on the whole “prestigious university” stuff, but I’ve always enjoyed Stanford.
Third, Stanford is in Palo Alto where the whole tech scene is. I thought it’d be cool to check out the area.
–
How I found this
I’ve been asked quite a few times how I found this program. I was searching around what certain occupational and physical therapy program requirements were (long story) and noticed one mentioning having to work with cadavers. To do so, if you missed out on that college’s program, you could use Stanford’s. I went to their webpage, send an email, and within an hour have a time and date offered to me.
The coordinators of the program were very easy to work with. They adjusted to my schedule. Rather than a regular student who normally does 2 hour installments over the course of a few weeks, they were able to fit me in on back to back days, 3 hours each day.
I’m only aware of one other program similar to this, something Tom Myers of Anatomy Trains organizes. Myers’ program is five days, a couple grand, and you’re in some fashion part of the actual dissection. Stanford’s is up to 6 hours (I’m sure you could do more if you asked), about $500 depending on how you do it, and you use prosections (already dissected cadavers). My main motive was to see actual cadavers; I don’t have much desire to go through the dissection process right now. Plus, I could save $1500 for my beer account.
I looked around quite a bit for another program similar to this and didn’t find anything. It really seems like it’s one of a kind, as getting access to cadavers is not easy. From what I was told it seems to be a cost thing, and cost isn’t an issue for a place like Stanford.
–
Going into the lab
Stanford is a nerd’s heaven. Everywhere on campus there is research building this, engineering building that, a stem cell building, a cancer building, a building where I swear it looks like their building an army of robots; it’s pretty surreal to walk around. And I only checked out the med school area.
To get into the lab you take an outdoor, glass elevator (weird) into a basement. As you walk around you see “Radioactive” “Dangerous chemicals” “Clearance needed”, you feel like this is where the atomic bomb was made. Upon opening the door to the anatomy lab you’re greeted with at least 35 blue bags all filled with bodies. Not to mention tons of plastic bins with specific body parts.

A bunch of med school students were studying up for their finals. Part of me was a little nervous. While I’m pretty confident in my anatomy, I was almost afraid there was some hidden part of the human body I didn’t know and I’d be embarrassed with my lack of knowledge. Then there was one point I got some amusement when I saw a student struggling to figure out where the piriformis and sciatic nerve was. In my head I was thinking, “Ah, I should be ok with this.” Along with, “PSHH STANFORD MED STUDENT MY ASS!” Which I’m sure was only my envy in the fact he got to study with this stuff everyday.
What was great is I was set up with an anatomist who is also a practicing physical therapist. Therefore, we were able to talk about the anatomy in a very applicable way. “A tear in this muscle may change how we approach exercise in this manner.” (I’m not going to reveal who I worked with. I know university’s can get weird about this stuff. If you’re interested in the program and want a recommendation, feel free to email me.)
I also wasn’t allowed to take pictures. I tried to play coy with this and go, “So, do the med students take pictures to help them study when they’re on their own?” Hoping they’d say yes and I could ask if I could do the same thing. But nobody is allowed to take pictures. My guess is it’s something to do with potentially damaging the cadavers, but who knows. It’s still pretty sweet if you’re a student. As best I could tell you can go into the lab at any time and pick up the cadavers to study. Anyways, I will try to be as descriptive as possible and use whatever pictures I can to help with this.
–
What we went over
I mentioned to the coordinator I was more interested in nervous tissue as I thought, relative to my knowledge base, that’s what needed the most work. That said, we still covered other things. All in all, it was quite a bit. The first day was more upper body and the second day more lower. Here is a list:
- Bones of the upper limb.
- Ulna, radius, humerus, scapula, clavicle, carpals.
- Bones of lower limb.
- Pelvis, femur, tibia, fibula, talus, calcaneus.
- Spine and spinal cord.
- Vertebrae, discs, facet joints. processes.
- The cord was really cool. They had a spinal cord with half of the vertebral body cut off on the posterior side so you could see the entire spinal cord, from the cerebellum (which was attached!) to the sacrum.
- Just about every muscle of the upper limb.
- Just about every muscle of the lower limb.
- The diaphragm.
- All the major nerves of the upper body, with particular emphasis on those emanating from the brachial plexus.
- All the major nerves of the lower body, with particular emphasis on the femoral and sciatic branches.
- All the major arteries. Abominal aorta, brachial, femoral, and more.
- A half and full knee replacement.
- That “new” knee ligament.
As you can see, that’s a lot to go over in 6 hours. You definitely need a solid base before going into this. Otherwise you’re going to be lost.
Quite a bit of things were review for me, but between the instructor and the cadavers I was able to see some things I hadn’t seen before, along with seeing familiar things in a different light.
This is going to be long. I split some of the sections into their own posts for those looking for more specific reads. (Located on the home page.) I’m going to start with things I feel were specific to working with cadavers, then make my way into things this experience helped elucidate.
Cadavers are harder
For as cool as it is to use a cadaver, in comparison to pictures, they’re much tougher to figure out what you’re looking at. It’s not like everything is cleared, where there are hundreds of different cadavers for each individual thing you’re observing, such as in models or pictures. You know, one for the rectus femoris where nothing else is on it. No, you have to go searching around. You need to orient yourself, “Is this lateral or medial? Anterior or posterior?” “Which glute is that? What’s under the glutes?” Is that the extensor hallucis longus or flexor hallucis longus? Oh, it’s the flexor. But wait, is that the hallucis longus or digitorum?” With the muscles this isn’t so bad. There were some tricks I knew right away. With the nerves, arteries and veins, it’s tough. The instructor backed this up, repeatedly mentioning how common it is to confuse something like the tibial branch of the sciatic nerve for the tibial vein.
This did two things. 1) Give me more respect for surgeons. 2) Scare the shit out of me at how easy it is to mistakenly cut one thing thinking it’s something else. Food for thought should you be contemplating a surgery.
Muscle girth
When only using pictures it’s typical to assess the size of a muscle based on it’s surface area. What you can appreciate in a cadaver, but can’t in pictures, is the girth of a muscle. How much meat does it have?
I was stricken by a four muscles in particular:
- Two which were surprisingly thick:
- Teres major

I never hear anyone talk about this muscle, yet it does what many people are often trying to avoid: Excessive internal rotation of the humerus. The thing looked and felt like a heavy, solid, rod.
-
- Adductor magnus

Same idea. I never hear anyone talk about this muscle, yet it’s practically the size of the some of the hamstrings combined!
- Two which were surprisingly tiny:
- Pec minor

This muscle is obsessed over yet you can barely find the damn thing. It’s a tiny little flap of muscle. It’s practically paper thin. Picture a filet mignon in front of you. You know how it only comes in small portions so you cut it up in small slices to savor it? Picture cutting a slice of your filet and calling that your pec minor. Do you really think you need an entire corrective exercise program dedicated to loosening this thing up?
-
- Piriformis

Another muscle which is obsessed over. I saw this thing and said, “Wow, that’s small.” It was a while ago I came around to most “piriformis issues” actually being lower back issues. Before I could say to the instructor, “Hard to fathom that has such an impact on the sciatic nerve” the instructor goes “Hard to fathom that has such an impact on the sciatic nerve. You can really see how most piriformis issues are probably starting at the lower back.”
Rather than fret over piriformis syndrome it’s probably better to fret over “Lower back causing radiating nerve pain syndrome.”
Amount of fascia around the knee
I was interested to see how much fascia would remain considering all these cadavers had been dissected already. You could see some, but clearly most of it had been pulled apart. I asked the instructor about fascia and they immediately went, “Ah, this fascia stuff is all the rage right now, isn’t it?”
We talked for a couple minutes about it and shared much of the same philosophy. We know it’s there, we know it does stuff -what, us and nobody is quite sure- but does it really require it’s own treatment? In terms of a manual therapist, if you’ve been manipulating muscle all these years haven’t you also been working on fascia already? If you’re exercising people, aren’t you exercising muscles and fascia (and nerves and the brain and the vascular system and everything else)?
Beyond that, what I took away from the cadavers in regards to fascia was how much of it was still present, despite the dissections, in certain areas. Most notable was the knee. There was a ton of fascia around the patella. Enough to make me reaffirm my belief you really can’t make too much of noises around the knee area, like popping and clicking. With so much in that area, it’s to be expected. This is of course with the caveat it’s non-painful noise. I then thought about how it makes sense after knee surgery to have odd sounds and sensations. A ton of fascia gets drilled, pulled and torn apart.
I guess this is a bit hard to describe. You probably need to see it and feel it to really understand.
The psoas rolls deep
Dealing only in pictures the last few years really made me lose appreciation for how deep the psoas muscle is.
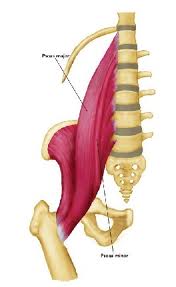
We used one cadaver where, besides the skin, everything from the anterior trunk to the posterior trunk was present. Translating this to manual therapy on the psoas, you need to deal with and or go through:
- Skin
- Fat below skin (which can be a lot depending on the person)
- Fascia
- Rectus abdominus
- External obliques
- Internal obliques
- Transverse abdominus
- Large intestine
- Small intestine
- Water and various fluid
To think you’re going to effectively reach this muscle with a foam roller, tennis ball, or theracane, well, good luck. To think a manual therapist can effectively get to this muscle, well, perhaps a few who are very, very skilled.
Even if they can, you can’t do so without working the abdominals. Are you sure your abdominals need the work you have to give them in order to reach the psoas?
Second, I’ve heard some talk about moving other things out of the way in order to reach the muscle. You’re still risking pressing on the organs and other critical structures, and I’m not so sure we should be doing anything dealing with moving or pushing these around. I saw one technique state, “As you press deeper, if you feel pulsing, you’re pressing on the abdominal aorta! In which case you should move your hands laterally.”
Third, this type of work on the psoas is regularly regarded as exceptionally painful. After seeing how deep it is, I think “No shit. It’s like getting punched in the stomach.”
Evolution is pretty smart. Maybe pressing on the psoas and pushing in this area is painful because the psoas needs to be “released.” Or, maybe, you know, the body is crying out to stop because it’s worried about you pressing on the abdominal aorta.
Stupid body. All worried about living and crap.
Orientation of the spine’s facet joints
I, along with many others, talk about how certain parts of the spine respond to certain types of motion. Most prominently talked about is the lower back not responding well to rotation. I’ve seen research on this, read Stuart McGill’s work, yada yada.
What’s ironic here is many mention this fact, yet when it comes to application all you see is people talk about flexion and extension. We’ll come back to this.
My instructor helped me see how the spine prefers to move by looking closely at the facet joints.


The facet joints are how the vertebrae move in relation to one another.

The easiest way to visualize this is to use your hands. Put one on top of the other. For the cervical vertebrae the facets (hands) are slanted forward:
For the thoracic they are pretty much upright:

And for the lumbar they are upright. However, instead of being vertical they’re horizontal:


Remember, the facet joints move on one another. Can you see how the cervical spine is built more for rotation, the thoracic more for side to side (lateral) motion, and the lumbar more for up and down (flexion and extension)?
Cervical; lateral view:

Which is similar to someone rotating their head side to side:

Thoracic; lateral view:

The lateral thoracic view is tough to see. You can see things better by looking at a posterior view:


Lumbar; lateral view:


Similar to someone bending forward and back:

It makes sense then people with neck issues tend to fit into a too much extension pattern, those with thoracic into a too much flexion pattern, and those with lumbar into a too much rotation pattern. These spinal segments don’t like these motions.
You may see people with too much cervical flexion or thoracic extension, but this is really rare. The point is you don’t often see people with rotation issues at the neck or side bending issues at the thoracic spine. At least not to the point of causing cervical or thoracic pain. These spinal segments like these motions.
Going back to my earlier comment about focusing on lumbar extension and flexion: The lumbar spine is actually made for this type of movement! No, that doesn’t mean you want to deadlift with a rounded back. But, it does mean you should probably take your obsession with flexion and extension and concomitant focus on rotation, and flip that around.
Lastly, this is a dimmer switch. In regards to rotation, as you move down the spine the switch goes from bright (embracing rotation)-yet not blinding, to dark (disdaining rotation) -yet not blacked out. It’s not like all the cervical spine is great with rotation and horrible with flexion / extension. There is a transition as you move down the spine. What you takeaway from this is certain parts of the spine handle certain motions better.
Using these biomechanical observations with what everyday people tend to do: There’s really no reason to do anything resembling extension at the cervical spine, flexion at the thoracic spine, or twisting at the lumbar spine. You’re playing with fire.
Pulling shoulders back changes what scapular plane is
Two common ways people go about alleviating shoulder pain is 1) Pulling the shoulders down and back and 2) Working the arms in the scapular plane. I’ve indirectly covered why the “Down and back” cue is poor. Examples here and here, and I’ll write directly about it in the future.
The instructor and I went over the scapula and the planes of motion, and something else regarding these cues clicked in my brain. In a normal scapular alignment, the scapular plane is 30 degrees from the midline. Essentially, you lift your arms in a V motion.

However, focus on pulling your shoulders down and back and you change where the scapular plane is. It moves from 30 degrees to however far back you’re pulling your scapulae.


“Shoulders back.”
Per the links above, most people don’t need more scapular retraction, which is what happens when people pull their shoulders back. Next, the combination of telling people to pull their shoulders back and work them in the scapular plane is likely causing the person to not work the arm in the scapular plane, because you’re changing where their scapular plane is.
Carpal tunnel
One area a cadaver made things easier was understanding the carpal tunnel. From the top there is a bunch of stuff covering it.

Palm of the hand.

Once you get down to it though, it’s really a simple tunnel formed by the bones.

We can get a little fancier by looking at things through a cross section:

Adding other structures:


We talked a bit about carpal tunnel surgery. If you don’t know, it’s pretty simple. The idea behind it is the transverse carpal ligament becomes thickened; putting pressure on the median nerve, so it’s cut to relieve this pressure:

Transverse carpal ligament thickened.

Transverse carpal ligament cut
I started thinking what would cause this pressure on the nerve. Why would the ligament become thickened? Is that always the case, that it’s always the ligament? I don’t know much about carpal tunnel syndrome; it’s not something I see in my clients, so I looked around a bit. Pretty much all I found was “It’s likely congenital,” “May be associated with previous trauma,” “Nobody really knows why it happens.”
A couple places reference “women get it more than men and this is likely because their tunnel is smaller.” These places also reference carpal tunnel syndrome is only in adults; never children. Don’t children have the smallest tunnels of all? These explanations didn’t sit well with me.
I went cruising through the second edition of Movement System Impairment Syndromes, which deals with the hand, thinking there has to be some possible movement issue(s) with carpal tunnel too. I found something that made a lot of sense.
“CTS may be aggravated during gripping or prehension when using the finger flexors with the wrist flexed because this movement pattern results in anterior movement of the flexor tendons.”
Let’s go back to our drawing to put this in easier to understand terms.
This explanation is saying when you bend your wrist and grab something at the same time, the flexor tendons move forward, possibly putting pressure on the median nerve.

Flexor tendons moving forward.
You can easily see this connection with your own hand. Bend your wrist, flex your fingers, and watch how the tendons in front of your wrist bulge out:

Different angle:

Now notice the difference if the wrist is stationary and only the fingers flex:

The tendons don’t glide forward.
This seems to coincide with a much greater amount of people who grab a lot, such as assembly workers, getting carpal tunnel issues compared to desk workers. Think grabbing a box: Wrist and fingers both flex.
If you’re someone with carpal tunnel symptoms, who grabs a lot, you may very well need to change how you’re grabbing things i.e. keep your wrist straighter. This meshes with how many people seem to get relief from a wrist splint -it keeps the wrist straight; preventing anterior glide of the tendons.
My injury history and the amount of anesthesia for ACL surgery
Repeatedly throughout this the instructor would mention how a certain area was associated with certain injuries. Nearly injury for injury I could go, “Yeah, I had that.” They asked about Osgood Schlatter’s, “Yep, know what that is.” Dislocated joints, “Yep, had three of ’em.” At one point there were two other students with us who asked about ACL surgery and if it had something to do with cutting the gracilis.
“Oh yeah, they cut the gracilis and part of the semitendinosus right there. Then they bundle that up together, drill it here to here, screw it in, over about a year it turns from a tendon into a ligament, and if you’re lucky you have a new ACL.”
The instructor, knowing my injury history at this point, got a good laugh in. “Well, at least you can relate to a great deal of your clients!”
Later on when we were delineating the femoral nerve the instructor started talking about how during very painful leg surgeries they will issue a femoral nerve block. Where anesthesia is injected directly into the nerve to help block pain. The other students gave expressions of, “Christ, that’s intense.” I kept to myself when I went, “Had that done too.”
Which then got me thinking how painful ACL surgery is. While I had barely any pain, for most people this thing is unbearable. Before you say, “Well, that’s why they give you all the drugs.” I want to make it clear this surgery is excruciating even with all the drugs!
From what I remember, I had a femoral nerve block, general anesthesia (your typical gas mask), a great deal of celebrex right before surgery -all on an empty stomach- then a prescription for 80 double dose pills of percocet after surgery, where the surgeon told my dad “Make sure you come back if he needs more.” That is an INSANE amount of pain remediation. There’s also the 5 days of antibiotics.
That “new” knee ligament
When looking at some knee models I asked about the new knee ligament that recently made waves in the medical news. I’d been asked and emailed about this a few times myself. The instructor had the same view I did. We both doubt anything new was discovered. More so some people decided to name something differently. Because if after all these years surgeons were unaware of an entire ligament in the knee, there should be a serious problem.
You don’t need to know everything
Something refreshing to hear was the instructor reference you don’t really to need to know everything. We were going over the brachial plexus, an area renown for being difficult to memorize.

We were talking about where everything started and ended. We briefly went over the roots, trunks, divisions and cords.

Rather than delve into these the instructor goes, “We don’t really need to know all these for our purposes (exercise purposes). What’s good to know is where all these nerves start and end.” The idea being if someone has a hand issue we may need to look not only at their hand, but their neck too.
This is a conclusion I came to long ago -you don’t need to know everything anatomy wise- but it was relieving to hear an anatomist echo the same. You can only hold so much in your brain. Knowing certain certain anatomy may be cool, but are you really ever going to apply it? The time and effort to learn some things is at the expense of other potentially more useful stuff. Plus, holding the former in your brain may be at the expense of holding more applicable matter.
One caveat here: The amount of anatomy most personal trainers and physical therapists know is woefully inadequate. You might not need to know everything, but most of us need to know more than we currently do. You might not need to be able to perfectly describe a cadaver, but you should probably go learn from one anyways.
–


Stephane
January 27, 2014
Very interesting. Thanks for taking the time for sharing.
reddyb
January 27, 2014
You’re very welcome.
Pam Udell
July 14, 2014
Thanks for the information. I may have to go visit Stanford.
reddyb
July 16, 2014
Great place to visit!